Step 2 is the hard part.

Matt Ginzton writes here.

Restore From Backup

| Comments

The SSD in Vanessa’s iMac died and needed to be replaced. In theory, this is pretty simple since we have backups — replace the faulty hardware, restore the backup, and get on with life.

In reality, it’s a little more complicated. I suppose these are small complaints since in the big picture, she didn’t lose any data. Still.

The way I carried out the restore was to

  • Attach the replacement SSD in an external USB enclosure (the “drive toaster”)
  • Boot off the recovery partition of the failing SSD, which still worked well enough for this purpose (otherwise I would have had to make a bootable USB stick or DVD)
  • Invoke restore from Time Machine onto the new drive
  • Power down, open the computer, and install the new SSD in place of the old one. (This is the hard part on a recent iMac, involving taking the screen off with suction cups, and so on.)

And we’re done, right? Not quite. Even after the Time Machine restore, a bunch of things were wonky:

  • There’s no recovery partition on the new drive. You’d think Time Machine would recreate that, too, but it doesn’t. Internet wisdom says all you need to do is reinstall the current version of Mac OS X over itself and it will automatically recreate the recovery partition; I tried it and that wasn’t the case. What this means is the next failure will be harder to deal with because I’ll need alternate boot media; the manual means of creating the recovery partition at this point seem just as hard as dealing with that problem when it arises, so I’m ignoring it for now.
  • Legitimate licensed Adobe CreativeSuite apps had their copy protection crap out, and refused to run with scary messages from the licensing subsystem using the word “catastrophic”. I called Adobe tech support, and they took 20 minutes to tell me to uninstall and reinstall the apps, which took another 20 minutes but worked.
  • CrashPlan backups weren’t running because their software uses Java and Mac OS X ships without Java until you launch an interactive Java app at which point you’re prompted whether you want to automatically install a Java runtime.
  • Time Machine backups weren’t running because who knows why, until I went into System Preferences and manually prodded them to run once, after which they kept running fine automatically.
  • Mac App Store wasn’t automatically updating software until I launched it and manually signed in.

These problems could have been caused by the hard drive replacement, the restore from backup, or the OS reinstall; I don’t really know which. I just know there was a lot more to getting a working system back than letting Time Machine restore the files.

Google Account Access From an iPhone

| Comments

Google recently announced that after January 2013, they’ll be deprecating EAS access to Gmail (and calendar, and address book) for free customers (addresses ending in @gmail.com, and free Google Apps accounts). It’ll still be available for paid Google Apps customers, and it’ll keep working for normal customers who are already using it, but only on their existing devices.

This is bad news because EAS (aka Google Sync) has been and continues to be the best way to get Google services on an iOS device. In my opinion, iOS + Google Sync continues to be the best combination of mobile device and cloud services, but this change makes them work a little less well together.

Google Sync (EAS) is the best way to connect iOS to Google services because

  • One “account” (setup step in iOS) handles mail, contacts and calendars.
  • Until September 2012, this was the only way to sync contacts between iOS and Google.
  • Mail works better: Push works, and the delete button works the way you’d expect. (Supposedly both iOS mail client and Gimap mail server support IMAP IDLE, but they disagree on how, or something, because the result doesn’t work.)
  • Also, if you enable Google’s 2-factor authentication, you need to generate fallback “app-specific” passwords for all your devices1, and for EAS this is one per device, and without EAS it’s at least two2.

For these reasons, especially the second one, I’ve been using — and recommending to friends and family — EAS as the preferred way of connecting to Google accounts. In fact, I didn’t even realize that contact sync was now possible without it (Google just added CardDAV support in September 2012).

Similarly, I’ve been using — and recommending to friends and family — Google Apps (Gmail and friends) as my preferred provider for cloud mail/contacts/calendars. Apple’s track record for cloud mail services is spotty; even if iCloud is improving, I just don’t see the advantage over Google, especially if you don’t want to tie yourself to Apple devices forever3.

That leaves us trying to connect iOS to Google’s services as best we can. Which to be fair is pretty good, but losing EAS is a step back4. This speaks to something my friend Ken wrote months ago (in the context of the maps kerfuffle):

Why is it that two tech giants with best-of-breed tech in different areas rarely seem to be able to cooperate to produce an awesome product for the user?

This has been a bright spot in this regard, which is getting a little less bright at the end of January.

Google probably doesn’t care about keeping free EAS working because, in order of preference, they’d like to see

  • You using an Android device to connect to Gmail+friends
  • You using a (paid) Google Apps for Business account
  • And for anyone else, using a non-Google device to connect to a free Google account, there are still the open protocols (IMAP for mail, CardDAV and CalDAV for calendar and contacts).

Apple may not care about optimizing the Gmail experience for iOS users because

  • They’d like to see you using iCloud for mail+contacts+calendars
  • Plus they’ve already connected you to Google services using EAS, so why should they have to do it again differently.

In fairness to Apple, adding a “Gmail” account to iOS adds both mail and calendars (IMAP + CalDAV), and Google only added CardDAV support on the server side in September 2012 (i.e. after the current iOS release). Maybe, hopefully, Apple will make iOS “Gmail” accounts start supporting calendars via CardDAV in the next release. In the meantime, you have to do it manually.

I don’t see any reason why the open-protocol support from iOS to Google services couldn’t work just as well as EAS — if one setup step added all 3 protocols, and if push were made to work — but it’s not the case now.


  1. It’s too bad that native device clients basically negate the advantage of 2-factor authentication, since they aren’t compatible and force you to use the fallback mechanism.

  2. One for the “Gmail” account supporting IMAP and CalDAV, and one for the separate CardDAV account you have to add. And I don’t know whether/how “app-specific” password authentication actually works for the Gmail account type, given that it’s a hybrid of two protocols; it’s possible that doesn’t work in which case you would have to avoid the Gmail account type, generate 3 fallback passwords, and set up IMAP and CardDAV and CalDav separately.

  3. I’m complaining here about the flaws in the relatively good iOS support for Google services; I suspect that anyone trying to connect to iCloud from Android or Windows apps has it far worse.

  4. There’s some irony here in that the best way to connect some Apple software to some Google software is using protocols designed by Microsoft.

Previewing Markdown Files From the Terminal

| Comments

I’ve been wanting a way to preview Markdown-formatted text files from the terminal, ideally via less. Primarily, I think, because Github encourages it, a lot of open source projects are starting to include a README.md instead of a plain old README1,2; these marked-down READMEs are easy to view in Github’s web interface but not after (or before) you clone the repo into your own filesystem.

There’s zless that can understand compressed files; why not mdless that can understand Markdown files?

I went looking and stackoverflow came to the rescue with this question and answer about a less-style markdown viewer for UNIX systems, suggesting pandoc as the tool to translate from Markdown format to troff format. The suggested incantation there works for me under Debian Linux but not under Mac OS X because it relies on man’s -l option, which I’m guessing is a GNU addition not supported by BSD man. I had to figure out how to duplicate the processing that man -l does, which I knew involved troff (or groff); it turns out that groff understands a -man flag which predefines the macros used by manpages. The version using groff instead of man -l seems more portable (it works fine under Linux as well as Mac OS X), so that’s what I’ll use.

Hence, the following incantation to view a README.md file:

pandoc -s -f markdown -t man README.md | groff -T utf8 -man | less

Or, a mdless command implemented as a tcsh alias:

alias mdless "pandoc -s -f markdown -t man \!* | groff -T utf8 -man | less"


  1. As one data point for when this became common, README.md was added to the short list of common readme file names in this Wikipedia article on March 7, 2012.

  2. Not to be confused with REAMDE.

Mac Boot Drive Selection From Bluetooth Keyboard

| Comments

Twice in the last few months1 I’ve had to do troubleshooting steps on Vanessa’s iMac that involved booting from alternate volumes2. This is normally easy on a Mac, but not quite so easy on a Mac with a wireless Bluetooth keyboard3.

Both times, it was an exercise in frustration, as I give the reboot command and wait about 10 seconds for the reboot to actually happen; then I hold Command-R, watch the screen blink black, wait, watch it blink white, wait, chime, wait, Apple logo, wait, and… oh hello, login screen! That’s not right. I’ve just wasted a minute and I’m back where I started.

Apple’s support document on recovery mode makes it sound so easy:

Restart your Mac and hold down the Command key and the R key (Command-R), and keep holding them until the Apple icon appears, indicating that your Mac is starting up. After the Recovery System is finished starting up, you should see a desktop with a OS X menu bar and a “Mac OS X Utilities” application window. Note: If you see a login window or your own desktop and icons, it is possible that you didn’t hold Command-R early enough. Restart and try again.

After reading and rereading that, I try a few more times, holding Command-R earlier and earlier as Apple recommends, and, no luck. Wait a minute, I’m using a Bluetooth keyboard. Does that cause complications, like, the computer and keyboard aren’t able to communicate right at the beginning of the boot process? Yes4. Do I need to go find a USB keyboard to plug in? Not quite.

It turns out the magic answer is to reboot the computer, wait for the LED on the keyboard to flash (which is after the computer starts booting and chimes and does a self-test which on this iMac with 12GB of memory all takes about 20 seconds), and then immediately press and hold Command-R. Any earlier than that, and you’ll be ignored.

You’d think Apple’s help docs could mention this, since they’ve been shipping Bluetooth keyboards by default with all their desktop machines for years now.


  1. Both of these occasions involved disk failures in the Crucial M4 SSD I installed a year ago. You can probably guess that I’m not quite as happy with these as I wanted to be.

  2. Booting from CD to upgrade firmware, or booting from the recovery partition to attempt disk repair. Each of these requires holding a certain key down while the computer is booting.

  3. I put the same SSD model in my own computer, a Mac Pro tower with easily accessible drive bays and an old-school wired keyboard. It’s a lot easier to troubleshoot and a lot easier to repair. Murphy’s Law dictates that if we’re going to have problems with one SSD, it’ll be the one tucked away under the glass front of the iMac.

  4. Try googling for “boot Mac from CD” versus “boot Mac from CD bluetooth”. Big difference. The first one leads you to a simple answer (but deceptively simple in the case you have a Bluetooth keyboard); the second one leads you through a muddle of hundreds of confused people.

Visiting Ireland With Baby Dominic

| Comments

Vanessa and I wanted to take a real destination trip with Dominic, kinda sorta just to see if we could do it. Not that we were hoping or envisioning that it would be impossible, but it was hard to visualize, so we had to try.

We settled on Ireland as the destination based on two propositions: we can take the baby to the pub, and the people love babies. (These were the actual reasons recommended by an Irish friend of Vanessa.) OK, not that we’re such raging alcoholics that we can only travel to pubs, but “can take the baby to the pub” is actually a pretty good proxy for “is not uptight, and will be forgiving of people traveling with a baby”, which turned out to be true. Also true is that the Irish were not only gracious and charming hosts, but that many of them indeed like babies and know how to show it. For us, this translated to both people being prepared and understanding, but also to a lot of free entertainment. Dominic likes a lot of stimulation, and he got it.

I’m pretty proud of our itinerary, in retrospect, because we were making it up as we went along and it turned out really easy. No doubt it helps that Ireland is a small country, native English speaking (almost), and the people and culture are easygoing, so probably anything you do there is likely to go well. Still, for us it turned out remarkably easy to travel.

Here’s where we went:

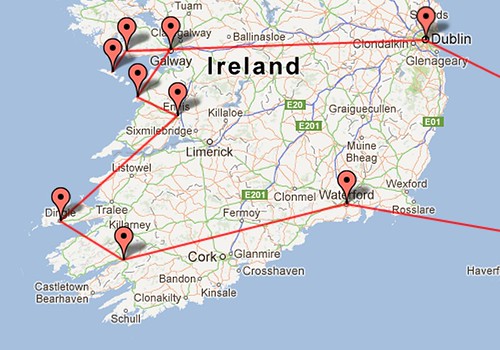
Ireland travel map

The itinerary, of which I’m proud because the transfers were so easy and involved only public transit: We flew from San Francisco to London and then immediately to Dublin and caught the city bus to our hotel. Dublin: 3 days walking around, with a side DART trip to Howth. Then we walked from our hotel to Heuston Station and caught the Irish Rail train to Galway, where we stayed at a hotel a block away from the train station. Galway: 2 days walking around, with a bus/boat trip to Inishmore (largest of the Arran Islands). Then we rented a car from the Budget office right next to the train station and drove south to the Cliffs of Moher, with an overnight stay at Ennis, then to Dingle. Dingle: 2 days walking around, with a drive around the peninsula loop. Then we drove onwards to the Kerry Peninsula and around the Ring of Kerry, then to Kenmare. Kenmare: 2 days walking around including a hilly and marshy segment of the Kerry Way. Finally, leaving Kenmare, we drove past Cork to Waterford, dropped our rental car off at the tiny airport there, and caught a flight back to London Luton, from where it was an easy train ride to the London neighborhood we were staying in.

Some photographic evidence of highlights from Ireland:

Howth, a scenic day trip from Dublin:

Picture perfect

Dominic disembarking the train in Galway with aplomb:

Psyched

Galway’s Dominick Street:

Cheery

O’Brien’s Castle above the Cliffs of Moher:

Castle

Dominic playing in the window seat at Murphy’s ice cream shop in Dingle:

Window shopping

Dominic and Vanessa taking a break from hiking the Kerry Way, above Kenmare:

Dominic and Vanessa

Have a look at the rest of our pictures.

The Effect of Time-shifting Electrical Usage on NEM Billing

| Comments

One more post on the topic of PG&E bills for solar (NEM) customers.

PGE’s NEM billing scheme blends usage across seasons to allow for seasonal variation in generated power, and their E-6 billing scheme separates usage into 5 time-of-use periods to encourage customers to shift usage away from peak periods.

A question that just occurred to me is whether you can game their billing results by time-shifting usage around inside the same true-up period, between TOU zones, months, or even seasons.

It’s pretty easy to move usage between TOU zones of the same day (say between summer on-peak and summer off-peak) by delaying energy-hungry activities like baking pies until night; that’s both tractable for a home customer and exactly the kind of behavior the E-6 TOU billing rates are designed to encourage. Moving usage between TOU zones of different seasons (say between summer on- peak and winter off-peak), or even from one monthly billing cycle to another, would be more difficult (it’s possible in theory but doesn’t really match human activity patterns to delay all your energy-hungry activities for months and then execute them in a big batch months later; alternatively you’d need a really big battery which is exactly what grid tie-in lets you avoid), but I’m still curious if it would be advantageous in some circumstances.

Again drawing on the example of my last year’s experience, the answer turns out to be yes for both forms of time-shifting. Say you’re going to bake a bunch of pies, and need to run the oven at 3KW for a little over 3 hours, consuming 10 KWh of electricity. (The 3 KW figure is realistic for an electric oven; the heating element running continuously is not; ignore that in the service of an example.) If you’re going to consume that 10 KWh, does it matter when you consume it; what’s the effect on your final true-up bill of adding 10 KWh at various different times?

If you can move that 10 KWh from a higher-value TOU period to a lower-value TOU period in the same day, you win; this turns out to be independent of tiering, consumption, or which month or season you’re in, which is a nice property. It won’t change your overall consumption for that day or month, so it won’t change your tiering calculation. If you had a surplus in the higher- value TOU period, you’ll now have a bigger surplus, which at the higher rate is more than enough to buy the same electricity back from PG&E later in the day, even if the solar cells aren’t producing at that time. (Basically, it wasn’t immediately obvious to me what the credit/charge calculations do in this case, because my intuition keeps wanting to tell me it’s better to consume energy when I’m getting it free from my solar panels than when I’m buying it from PG&E. That turns out not to be true; the NEM system means if you buy and sell the same amount of electricity at a given rate, it’s a wash, and the TOU system actually rewards you for selling it at a higher rate and buying it back at a lower rate.) So yes, you can “game” the E-6 billing system by moving usage from peak times to off-peak times, which use of “game” gets scare quotes because it’s actually the behavior they want to encourage.

Meanwhile, if you could move that same 10 KWh across months, the story is a lot more complicated. Due to tiering, you may be paying more than the baseline rate for some of your electricity, and since PG&E applies the tiering calculations entirely inside each month, based on that month’s usage, you can actually get crossover between “high-value” and “low-value” TOU periods. More concretely: as a solar generator, you may be paying more for winter off-peak electricity at 3rd-tier rates than you are for summer part-peak electricity where you never exceed the first tier. This is exactly what happened to me over the last year (note in the E-6 schedule that winter off-peak and part-peak above 130% of baseline cost about what summer on-peak baseline usage does, and winter off-peak and part-peak above 200% of baseline cost more than the summer on-peak baseline). While from the previous example you’d expect the result of time-shifting your usage to depend on the TOU rates (and you would win by shifting from a high-rate TOU to a low-rate TOU, and lose by doing the reverse), in fact it also depends on the tiering calculations, and you can also win by shifting usage out of a month where you had higher-tier usage into a month where you didn’t, and this can even be true if it involves shifting that usage from a low-rate TOU to a higher-rate TOU. So, surprisingly, you could see a net benefit from moving usage from winter to summer; it’s pretty easy to make the numbers work out if moving from winter part-peak to summer part-peak, and in extreme cases, you could even win by moving from winter off-peak to summer on-peak. This is decidedly not the result they want to encourage, so I’d call it gaming the system. (Of course, you’d need a way to actually buffer your usage across months; a better way to lower your winter bills is to simply use less electricity, without compensating in the opposite direction in the summer.)

I’ll note again that this perverse result derives from the fact that PG&E calculates and finalizes the tiering calculations entirely inside each month, instead of smoothing them across the true-up period, so it’s actually possible for a big energy user with an even bigger solar array to generate a net surplus for the year but be paying 4th-tier rates for winter electricity when the array is underperforming.

E-1 vs E-6 for Residential Solar Customers

| Comments

As a follow-on to my article on understanding the PG&E NEM bill, I decided to go back and recalculate our usage charges for the normal E-1 billing schedule, in addition to the E-6 I’m actually using.

I also threw in the calculation for the E-1 value of the electricity we generated instead of buying from PG&E, that is, how much we would have spent to buy all the electricity we used from PG&E if we hadn’t installed the solar array.

In short, E-6 was a solid win for us: a usage charge of $64.54 would have been $275.10 with E-11.

The results:

E-6 was a solid win for us. In the 6 winter months where we had a usage charge, the usage charge was about $10/month higher with E-12. In the 6 summer months where we had a usage credit, the usage credit was about $30/month lower with E-13.

On the flip side, E-6 has a “meter charge” of approximately 25 cents per day, or $92 per year4, which E-1 does not. So our true E-6 cost (for electrical usage, plus the privilege of E-6 TOU billing) is $156.88 for the year, and E-1’s true cost remains at $275.10.

It seems like E-6 would be an easy win for anyone who can generate all of their summer on-peak electricity, or especially all of their summer on-peak and summer partial-peak electricity. (You can compare the exact prices in the E-1 and E-6 billing schedules, but the E-6 off-peak rates and winter part-peak rates are lower than E-1 rates; E-6 summer part-peak rates are a little higher than E-1 rates; E-6 summer on-peak rates are a lot higher than E-1 rates.)

I also remember being told that PG&E will let you switch from E-1 to E-6 and then at the end of the first year, if you didn’t save money, you can take a mulligan and retroactively undo the switch and pay the E-1 rate. I can’t find confirmation of that on PG&E’s website today, though.


  1. You may notice that my earlier article lists our usage charge for the year as $60.22 and here it’s $64.54; the difference is that $60.22 is PG&E’s number and $64.54 is my calculation for what it should be (and I had to fudge the numbers for October 2011 where PG&E switched me from the old plan to NEM midway through the billing cycle, plus we may round differently, plus there may be other errors in my calculations). This seemed close enough to go through the rest of the exercise, and the technique used to calculate this number is the same one I’ll use for the E-1 number, so this seemed like the one to use for this comparison.

  2. E-6 is always a win in the winter, because there’s no winter peak zone; winter part-peak and winter off-peak are both cheaper than the E-1 rate. And between the solar array and our usage patterns, the vast majority of our PG&E usage was in the off-peak time anyway.

  3. Between the solar array and our usage patterns, we ran a surplus in summer on-peak and summer part-peak for nearly the entire summer, and had to buy summer electricity only off-peak. This is exactly the behavior that E-6 is designed to encourage, and it rewarded us correspondingly.

  4. So if you want a true zero bill from E-6, you need to generate enough of a surplus that it would counterbalance this $92/year “meter charge”. That would take 495 KWh of summer on-peak surplus or 1028 KWh of summer part-peak surplus, paid out at the “generation” rate due to the NSC rules.

One Year of Solar Power

| Comments

When I got solar panels installed on the roof of our house last fall, friends immediately started asking how well they were working out, and my answer had to be that while they’re generating a nice amount of power, I wouldn’t know how well they were doing on the actual goal of zeroing our electric bill until a year had passed. That year has now passed, and it’s time to answer the question.

If you add solar power to your grid energy, at least the way it’s done in California, two things will happen:

  1. Your electric bills will be lower, but
  2. You won’t understand them.

The problem:

California electric rates are confusing because they’re complicated and variable. You pay a different rate depending on how much you use (tiering)1. You can opt into time-of-use (TOU) billing2, which makes electricity more expensive at peak times and cheaper the rest of the time to encourage you to shift usage away from peak times. The normal residential billing schedule is called E-1 (“residential services”) and shows 5 different rates according to tier; the TOU residential schedule is called E-6 (“residential time-of-use service”) and shows 25 different rates according to tier and time.

Once you introduce solar (or other generation capabilities) into the mix, there’s another wrinkle. Assuming you stay connected to the grid, PG&E will convert your billing to what they call NEM (Net Energy Metering), which means your electric meter will measure the flow of power in both directions — from the grid into your house when you’re using more than you’re generating, and from your house back to the grid when you’re generating more than you’re using. But solar panel output varies by season and with weather, in addition to the obvious day/night cycle. To account for this seasonal variation, PG&E bills NEM customers on a yearly cycle called the true-up period. Your monthly bills are only an approximation, and at the end of the year they calculate the actual balance owed compared to what you already paid, and have you “true up” to that amount, hence the name.

For NEM customers, that’s 3 different axes of variation3: tiered rates based on total consumption, variable rates due to time-of-use, and true-up billing to account for seasonal variation of generated output.

Before adding solar generation

You have to calculate how much electricity you want to generate to produce the desired effect (economically or ecologically or both4), and then you need to calculate the size of a PV solar array that will produce that effect.

Both of these calculations actually turn out to involve a fair amount of prediction. Companies that specialize in solar installations (for example, Luminalt, who installed ours) can help you with these predictions and calculations.

But even after you’ve done the calculations, decided to go solar, and had the array installed and it’s live, you still won’t know if you were right, at least for a while. That’s what this post is about. I wanted to know if we’d predicted correctly, and I also wanted to know if PG&E’s billing methods fairly account for the seasonal variation. (If I have a large surplus in summer on-peak in July, and a big deficit in winter off-peak in January, do these cancel out, and how?)

After adding solar generation

I said that after activating a solar array and switching over to PG&E’s NEM program, you’ll get lower bills that you won’t understand. Here’s what I mean. Each month with my electric bill5, I get a separate “Net energy metering electric statement”. It includes three amounts:

  1. “total current month’s billed amount”, which is always in the neighborhood of $12.
  2. “current month energy charge or credit”, which is the actual charge for electricity I used, or credit for electricity I produced, after accounting for tiered TOU rates.
  3. “cumulative energy charges or credits for the current true-up period”, which is the sum of the #2 values.

This is hard to interpret month by month, partly because there’s no relationship between what I’m asked to pay (#1) and what I used (#2), and #3 will swing wildly one direction6 and then correct over the course of the year. All of this evens out at the end of the year, which is the reason for the 1-year true-up method of billing.

But when the 1-year anniversary arrives, and with it the final true-up payment, there’s a new confusing quantity: “total current month’s billed amount” is replaced with “total true-up billed amount”. This amount, which is your actual bill for the 12th month, is not the usual $12, bears no obvious relationship to the cumulative energy charge, and isn’t explained or derived by PG&E on the bill or elsewhere that I could find7. (In my case: my cumulative energy charge after 12 months was $60.22, and the “total true-up billed amount” was $22.02.) Why?

There’s a method to their madness, but I had to dig deep into PG&E’s rate documentation and then spend a few hours messing with a spreadsheet to try to derive the calculations that would map my usage to my bills.

Understanding true-up billing

First, the monthly bill. Where does this $12 come from? It turns out PG&E charges E-6 (TOU) customers a “meter charge” of approximately $0.25 per day. E6 and E-1 both also have a “minimum charge” of approximately $0.15 per day; they don’t explain what this means, but if my reverse engineering of my bills is correct, for NEM customers it’s essentially a placeholder for your usage before they know what your usage is. These fees added together and multiplied by the number of days in a billing cycle yield the approximately $12 amount that I was billed for each month (billing cycles ranged from 28 to 32 days, so the monthly bill ranged from $11.22 to $12.83, with the most common bill being $12.02 for a 30-day billing cycle).

Second, the usage charges. These are not simple (since they involve both the tiering and TOU calculations), but they are actually decently explained on the monthly NEM statement itself, and with one nitpicky exception8, they’re the same as what you had before you added NEM, and the true-up calculation doesn’t affect them.

Third, the cumulative usage charge. This one is completely straightforward: add the usage charges for the current true-up period, to date. Each NEM statement shows the current cumulative charge (this amount) and the amount by which it changed (the month’s usage charge), and you can verify that the current cumulative balance is equal to the previous month’s balance plus/minus the current month’s usage charge/credit. However, as mentioned above, this amount will swing one direction and then correct due to seasonal variation,

Fourth, the true-up amount. This is a simple calculation if you know where it comes from, but PG&E doesn’t explain it, so I had to reverse engineer it, learning to understand the daily meter and minimum charges. What it boils down to is that the $0.15 “minimum charge” is not a real charge once the true-up period is over, but a provisional placeholder: you pay this with each month’s $12 bill, but at the end of the year, when your real usage is known, you get back the provisional amount and pay the real amount. At the end of the year, you take your usage charge/credit, and add the meter charge ($0.25 per day or about $7.50 per monthly bill or $92.33 in a full year9), and that’s what you owe for the year. Except you’ve already paid that meter charge, plus you’ve paid the “minimum” usage charge as a provisional placeholder. So subtract the provisional usage charge ($0.15 per day or about $4.50 per monthly bill or $53.96 in a full year), and you have the amount that’s unpaid, that you must still pay in order to True Up. So, your first 11 bills are for 30-ish days of meter charges and minimum charges, totaling about $12; your 12th bill is for 30-ish days of meter charges, minus 335-ish days of minimum charges, plus your cumulative usage charge for the whole year. In my case, actual usage at the end of the year was $60.22, of which $46.27 had already been paid monthly as that “minimum” charge, so what I’d call the actual true-up component was $13.95; add in $8.07 in meter fees (32 days at $0.25/day) for the final billing period and we have what PG&E calls my true-up bill of $22.02.

Cancelation across TOU periods

I was curious whether a surplus in one TOU period (for example, summer on- peak, which is likely the best case for residential solar customers) can partially or wholly cancel a deficit in another TOU period (for example, winter off-peak, which is pretty much entirely dark, and thus worst-case for solar customers). As it turns out, PG&E doesn’t directly add and subtract usage across TOU periods; they convert usage to a dollar amount every month (based on TOU periods and tiering), then add and subtract the monthly dollar amounts. This is a clever way of accounting, since it’s pretty easy to understand, and does a pretty fair job of reconciling the amounts from different TOU periods. (In fact, it works out pretty well for residential solar customers, since your summer on-peak surplus is credited at a higher rate than that winter off-peak deficit.) My only complaint here is again that the tiering calculations are done per month and only affect you on the downside.

Raw facts

Here are the actual numbers from my house over the last year, which may be helpful in understanding the derivations here, making the descriptions more concrete, and/or planning your own PV solar system.

  • Generated by solar: 7195 KWh
  • Bought from PG&E: 1601 KWh
  • Total consumed: 8796 KWh
  • Months with positive grid usage, resulting in PGE charge: 6 (Oct-Mar)
  • Months with negative grid usage, resulting in PG&E credit: 6 (Apr-Sept)
  • Whole-year usage charge: $60.22
  • Value of electricity consumed if I had to buy it all from PG&E: $2052.34 (assuming E-1 and not E-6 billing, since I don’t have the generated KWh broken out by TOU period)
  • Prior-year electric bill: $1403.77
  • Granular usage (from PG&E’s point of view), broken down by month and TOU billing period:

Sum-up

The true-up billing method mostly but not entirely allows you to smooth out the seasonal variation, canceling bad performance one month against good performance in another month.

You can understand your monthly bills if you think of them like this: $12 a month, $7.50 of which is just for the privilege of being connected to the grid, and $4.50 of which is a deposit against your actual usage. Meanwhile, the actual usage bill accrues in the background, and at the end of the year, you pay this balance minus a $49.50 refund for those eleven $4.50 deposits.

Due to the low NCS reimbursement it still seems to me that the optimal array size is what brings you very close to even for the year, offsetting your usage without generating much of a surplus. However, due to the way usage tiers are finalized each month instead of across the true-up period, sizing your array slightly larger than this may pay off by reducing higher-tier winter bills, even though the net surplus KWh aren’t themselves valuable in the NCS calculation.

  1. The baseline usage, which determines the details of the tiering calculation, further varies by where you live in California and whether your home has a gas or electric primary heat source.

  2. You can opt into TOU billing regardless of whether you have solar or other generation facilities, but in general, it makes a lot of sense if you have generation capabilities and less sense if you don’t, plus most people not planning on adding solar won’t have the TOU option waved in their face and probably don’t even know about it. I don’t know the exact numbers, but I presume most NEM customers opt for TOU billing, and most grid-only customers do not.

  3. There’s another confusing way they split things up, but I’m not denoting it as an axis because it’s not orthogonal to the others. PG&E separates the rate into separate quantities for “generation”, “transmission”, “distribution”, and “the funding of public purpose programs”. We’ll come back to the reason for this bookkeeping sleight-of-hand later; it doesn’t really matter unless you generate a surplus, but if you do, look for this to raise its head in the Net Surplus Compensation calculation.

  4. If you believe solar power is cleaner than grid power, the ecologically optimal size for your home array is “as large as possible”, though of course there’s some ecological cost to PV panel manufacturing too. But if you’re trying to make your solar array economically viable, you’ll want to compare actual costs and benefits; the costs depend on the cost and output of the array and how long you plan to keep it and whether you buy or lease and the details of the financing, all things you can find companies or calculators to help with. The benefits depend on what you’re actually paying for grid electricity, which follows the complicated calculations already described. If you’re a light user paying baseline $0.12/KWh rates, you’ll save less than a heavy user paying 4th-tier $0.34/KWh rates. While the specifics vary, it’s probably easy to generate solar power for less than $0.34/KWh and somewhat hard to generate solar power for less than $0.12/KWh. What this means is most solar customers try to offset most but not all of their own usage, to get back down in the baseline tier. It’s often not cost-effective to compete with PG&E’s baseline rates. It’s especially cost-ineffective to operate at a net surplus, because of the way PG&E values the surplus: read their Net Surplus Compensation rules, paying special attention to the last section, “Why is NSC less than the credit on my NEM statement?”. In short, PG&E splits the “retail” rates that you’re used to seeing into separate components for generation, transmission, distribution, and the funding of public programs like nuclear plant decommissioning; your NEM credits come back at the retail rate until you hit break-even; however if you operate at a surplus, PG&E pays only a “wholesale-type rate for generation”. You can see the actual breakdown on the E-1 or E-6 billing schedules; I don’t actually know how to calculate the breakdown for E-6 since your surplus is for the year and it’s not clear which TOU rate to apply; in any case generation is less than half of the total.

  5. Actually not with my electric bill, because I’ve opted for paperless billing and told PG&E to stop sending me paperless bills, and I can look at the details on the website. But none of the NEM details are available on their website, nor is there an option to go paperless for the NEM data. So what actually happens is the NEM data shows up on paper in my mailbox a few days after I get the bill itself electronically.

  6. Which direction it swings will depend on when your true-up period starts. Mine starts in October and so the first few months are fall and winter, and I accumulated quite a large charge before April when I started getting credits. By the following October, it was nearly back to 0. If your true-up period starts in April, you’d presumably see the reverse, amassing a series of credits and a large negative balance over the summer before winter charges start to eat away at the credit balance.

  7. PG&E’s explanation of how to read this is split into four pages on their website, for the monthly statement, monthly bill, true-up-statement, and true-up bill. These pages explain the meaning of each item on the bill, but don’t explain how the amounts are calculated, or why you owe what you owe.

  8. The true-up calculation doesn’t affect the monthly usage charge calculation, but arguably it should, because the rates depend on tiering, the tiering depends on usage, and usage is supposed to be smoothed over the entire true-up period. But actually, the tiering calculations are done entirely inside each month. What this means is that in the winter when your solar array is underperforming, higher usage might push you into the upper tiers, and you’ll pay more for your grid electricity because of this, and no amount of summer credits can offset these higher rates. Again using my first-year numbers as an example, my assigned baseline value for the year sums to 2878 units, and my actual cumulative usage was 1601 KWh. (Or: the average of the monthly baselines was 240, and my average monthly usage was 133.) I’d argue that this means I should be paying only first-tier rates. However, because of the seasonal variation expected with solar generation, my usage from PG&E’s point of view is skewed heavily toward winter, and in fact I had above-baseline usage in only the 4 shortest months: November through February. Because PG&E applies the baseline-to-tier calculation on each month’s usage individually, instead of across the true-up period, I paid substantially more for electricity in those 4 months. In my case, I was charged $60.22 for my electricity usage, but if it had all been at baseline rates, I would have been owed a $5 credit.

  9. I’m writing this after my first year of NEM, and the PGE switched me over to NEM billing in the middle of a billing month without changing the billing cycle, so my first month’s NEM bill only included 9 days, and so my first true-up period of 12 bills is only 11 1/3 months or 345 days. Presumably, future true-up periods will be a full year.

One Year of Cellular Data

| Comments

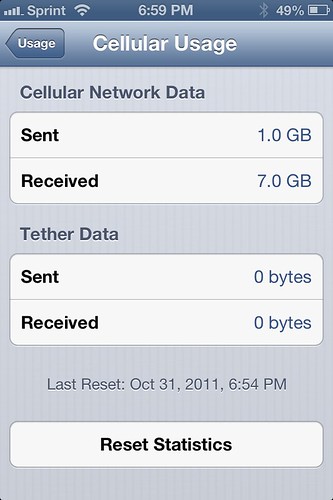
Here are the stats on my cellular data usage over one year on Sprint’s network1. (I got the phone on Halloween of 2011, and took this screenshot on Halloween of 2012.)

1 year of cellular data usage

7 GB down and 1 GB up; 8 GB total; that averages to 666 MB per month. Clearly I’m not a heavy cellular data user and not making the most out of Sprint’s unlimited data allotment; this would fit comfortably within the other carriers’ smallest real2 data plans (1GB/month).

Speaking of unlimited data plans: this might sound heretical to some, but I really wouldn’t mind metered data at a fair price. Say a penny a megabyte, billing you only for what you use. That comes out to $10 per gigabyte, which is actually the marginal rate that AT&T and Verizon are charging now anyway, except first they make you pay a minimum $30/month commitment and then they round up to the next gigabyte.

Of course, I also wouldn’t mind an unlimited plan that was cheap and fast and allowed tethering3.

In the meantime, here in the US we have Sprint offering unlimited data at a price that’s fair for heavy users but not especially cheap for light users, and their network isn’t the fastest and they have surcharge for tethering. Then we have AT&T and Verizon saying unlimited plans don’t incent them to invest in their networks so they’ve moved to metered plans; on the plus side their networks have gotten markedly faster and they don’t charge extra for tethering on the metered plans; however their metering methods don’t meet my definition of fair.


  1. Actually 11 1/2 months on Sprint’s network, and 10 days on O2 Ireland and 3 days on Three UK during a trip to Europe. Both of their data networks, but especially Three’s, were better than what I’m accustomed to in the USA, which is especially infuriating given they’re also much cheaper.

  2. Ignoring AT&T’s toy 250 MB/month plan.

  3. Which actually exists in much of the world, but not in the USA.

OAuth and Localization Fixes for Palm-Evernote Importer

| Comments

I’ve updated my utility for importing notes from Palm Desktop into Evernote again.

The big change is that it now uses OAuth for authentication to the Evernote service, instead of asking you for Evernote account credentials directly. This is a step forward in general; utilities like this one shouldn’t have unrestricted access to your entire account, nor should they know your actual password in case you use the same password for other services1. Evernote has disabled username/password logins for third party apps to force them to use OAuth, a move which I think more services should make2.

I also made some smaller changes to further improve the chance of success for people outside the USA, using nondefault character encoding or locale settings.

Finally, I added the public source repository to my github account. (I’ve always made the source codefor the current version available, but now the complete repository with history is public.)

Download here: http://www.maddogsw.com/evernote-utilities/evernote-palm-importer/.


  1. Which you shouldn’t do, but lots of people do anyway.

  2. I’m looking at you, Google Reader clients.